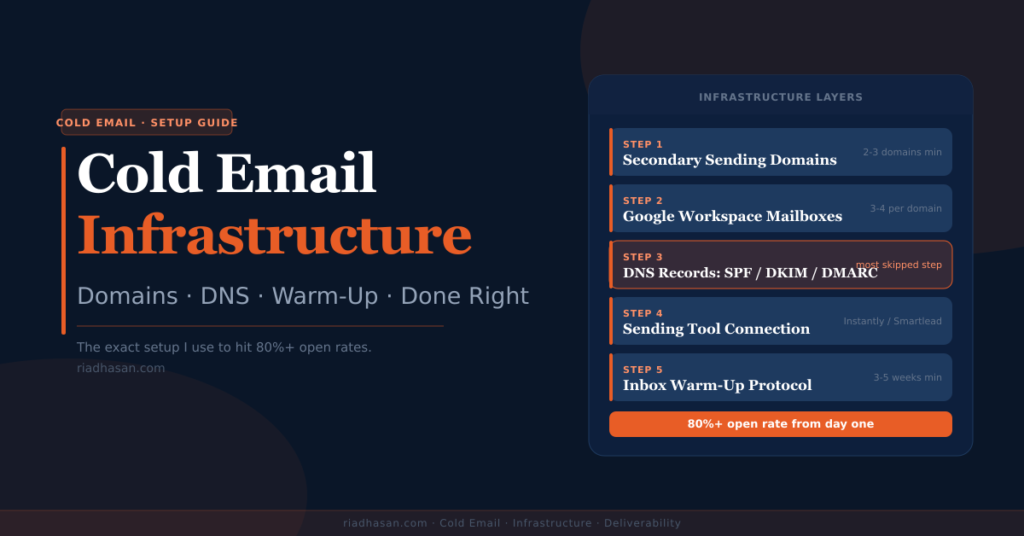
Cold email campaigns fail before a single email is sent. Not because the copy is weak or the targeting is off. Because the cold email infrastructure underneath it is broken.
I’ve set up cold email infrastructure at every scale: solo founders running 3 inboxes, all the way to the 6,000-account, 1,500-domain build I did for OutboundBin in 30 days. The fundamentals are identical regardless of scale. Get them right and your emails land in primary inboxes from day one. Skip them and you’re burning domains and wondering why nothing works.
This guide covers the complete setup: domain selection, mailbox configuration, DNS records, sending tool connection and warm-up. In the order you actually need to do them.
Why Infrastructure Comes Before Copy
Most people building their first cold email campaign spend 80% of their time on sequences and subject lines. That’s the wrong order. A perfectly written email sent from a misconfigured domain lands in spam. It never gets read. No reply rate, no meetings, no pipeline.
Infrastructure is the layer that determines whether your emails are even seen. Once it’s right, copy and targeting do the work. Until it’s right, nothing else matters.
Here’s what proper cold email infrastructure delivers:
- Primary inbox placement instead of spam or promotions
- Your main domain protected from deliverability damage
- Sender reputation built before campaigns go live
- Scalable sending capacity without hitting per-account limits
Related reading
What Is Cold Email? — the full definition, how it works and what separates it from spam.
Step 1: Buy Secondary Sending Domains
Your primary domain (the one on your website and email signature) should never send cold email. If a campaign triggers spam complaints or lands on a blacklist, you want that damage contained to a secondary domain. Not to the domain your entire business reputation sits on.
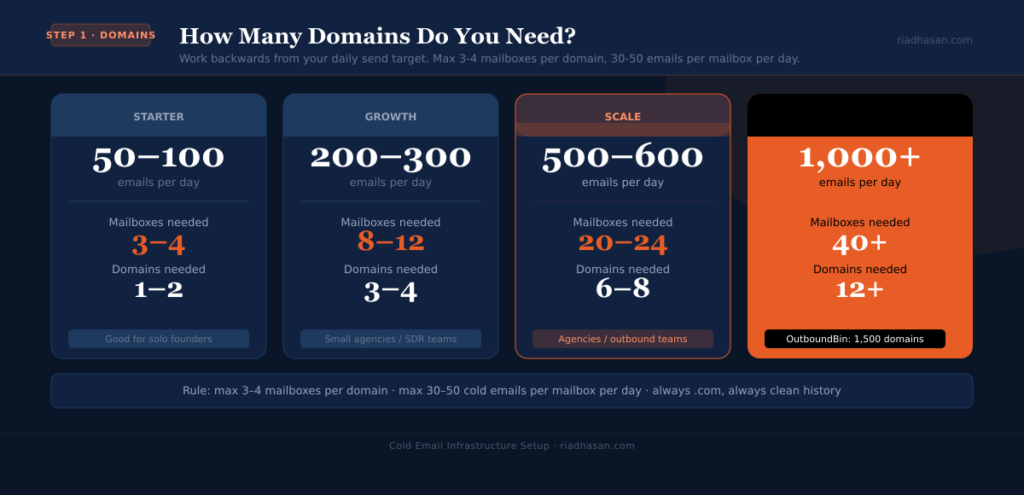
How many domains do you need?
The standard ratio is 3–4 mailboxes per domain, with a maximum of 30–50 cold emails per mailbox per day. Work backwards from your target send volume:
| Daily send target | Mailboxes needed | Domains needed |
|---|---|---|
| 50–100 emails/day | 3–4 | 1–2 |
| 200–300 emails/day | 8–12 | 3–4 |
| 500–600 emails/day | 20–24 | 6–8 |
| 1,000+ emails/day | 40+ | 12+ |
What to look for in a sending domain
- Close variation of your main domain — something recognisably you. If your main domain is riadhasan.com, sending domains might be riadhas.com, riadhasan.co or rh-outreach.com.
- .com where possible — .com extensions carry more deliverability trust with email providers than newer TLDs
- No prior history — check each domain on MXToolbox before buying. A domain with a spam history from a previous owner is a liability from day one.
- At least 2 weeks old before sending — brand-new domains that immediately start sending email look suspicious to filters
Where to buy them
Namecheap is the most efficient registrar for cold email domains: bulk management, competitive pricing and a clean DNS interface. For the OutboundBin 6,000-account project, all 1,500 domains were registered through Namecheap. At that scale, their bulk management dashboard was the only viable option.
Google Domains (now Squarespace Domains) and Cloudflare Registrar are solid alternatives. Avoid GoDaddy for bulk setups. The interface becomes painful at any scale above 10 domains.
Step 2: Set Up Google Workspace Mailboxes
Google Workspace (formerly G Suite) is the standard choice for cold email mailboxes. Gmail’s sending reputation is among the highest of any email provider, which matters for inbox placement when emailing other Gmail and Google Workspace addresses, which covers most B2B contacts.
Primary vs secondary domain — what’s the right structure?
This is the most common question I get about cold email setup. The answer depends on your situation:
| Primary domain | Secondary sending domain | |
|---|---|---|
| Use for | Website, business email, inbound | Cold outreach campaigns only |
| Risk if damaged | Business-critical — catastrophic | Isolated — replace the domain |
| Cost | Already have it | ~$10–15/year per domain |
| Recommendation | Never use for cold email | Always use for cold email |
How many mailboxes per domain?
3–4 mailboxes per domain is the working standard. Going above 4 per domain starts to look unusual to email providers and increases the risk that a single domain’s reputation issue takes down multiple accounts.
In the OutboundBin project, the architecture was: 150 Google Workspace admin accounts, each managing 10 domains and 40 mailboxes. That’s exactly 4 mailboxes per domain at scale. The same ratio I use for every project, whether it’s 12 accounts or 6,000.
Google Workspace reseller accounts
If you’re setting up more than 20–30 mailboxes, buy Google Workspace through a reseller rather than direct. Reseller pricing is typically 40–50% below Google’s direct rates and the management interface is built for bulk operations. For the OutboundBin engagement, using a reseller saved the client several thousand dollars per month on Workspace subscriptions.
Step 3: Configure DNS Records
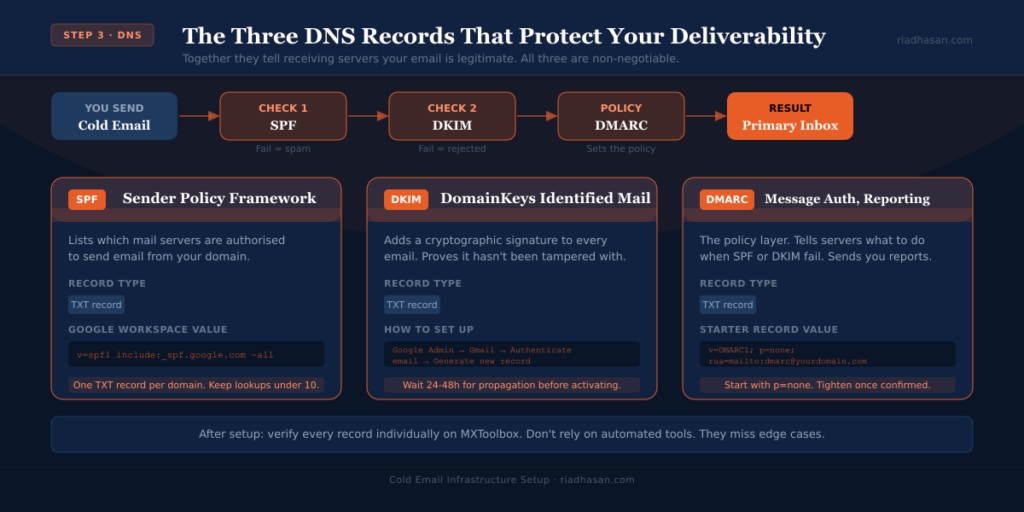
This is where most DIY setups go wrong. SPF, DKIM and DMARC are not optional extras. They are the authentication layer that tells receiving email servers your messages are legitimate. Without them configured correctly, even the best copy lands in spam.
SPF (Sender Policy Framework)
SPF is a DNS record that lists which mail servers are authorised to send email on behalf of your domain. When a receiving server gets your email, it checks whether the sending server’s IP address is in your SPF record. If it isn’t, the email fails authentication.
For Google Workspace, your SPF record looks like this:
v=spf1 include:_spf.google.com ~all
Add this as a TXT record in your domain’s DNS settings. If you’re using another sending provider alongside Google, add their SPF include as well. Keep the total DNS lookup count below 10 or SPF will fail.
DKIM (DomainKeys Identified Mail)
DKIM adds a cryptographic signature to every outgoing email. The receiving server checks this signature against a public key stored in your DNS records to verify the email genuinely came from your domain and hasn’t been tampered with in transit.
To set up DKIM in Google Workspace:
- Go to Google Admin Console → Apps → Google Workspace → Gmail → Authenticate email
- Select your domain and click “Generate new record”
- Copy the generated TXT record and add it to your domain’s DNS
- Return to the Admin Console and click “Start authentication” once DNS has propagated
DKIM propagation typically takes 24–48 hours. Don’t start sending until you’ve confirmed it’s active.
DMARC (Domain-based Message Authentication, Reporting and Conformance)
DMARC tells receiving servers what to do when an email fails SPF or DKIM authentication and sends you reports on authentication results. It’s the policy layer that ties SPF and DKIM together.
A basic DMARC record for a new sending domain:
v=DMARC1; p=none; rua=mailto:dmarc@yourdomain.com
Start with p=none (monitor only) rather than p=quarantine or p=reject on a new domain. This lets you receive reporting data without risking legitimate emails being blocked if there’s a misconfiguration. Move to a stricter policy once you’ve confirmed everything is working correctly.
The rua tag is your reporting address. Use a real mailbox you monitor. The reports tell you if anyone is spoofing your domain, which is worth knowing.
Verify every record manually
After adding all three records, verify each one individually using MXToolbox or Google’s own Admin Toolbox. Don’t rely on automated tools to tell you everything is fine. They miss edge cases.
At 1,500 domains for OutboundBin, I verified every SPF, DKIM and DMARC record individually. A misconfigured DMARC policy on a shared Google Workspace account can blacklist every mailbox in that workspace simultaneously. At 40 mailboxes per workspace, one error costs you 40 accounts. Manual verification takes longer but it’s the only way to guarantee a 100% health score.
Custom tracking domain
If you’re tracking email opens or clicks, configure a custom tracking domain rather than using your sending tool’s default tracking domain. Shared tracking domains are used by thousands of senders (including spammers), which hurts deliverability. A custom tracking domain keeps your tracking reputation isolated.
Add a CNAME record in your DNS pointing to your sending tool’s tracking server. Instantly, Smartlead and most other tools have a setup guide for this in their settings.
Step 4: Connect to Your Sending Tool
Once DNS is configured and verified, connect your mailboxes to your sending platform. The two most widely used tools for cold email in 2026 are Instantly and Smartlead. Both support multi-inbox sending, warm-up and campaign management.
OAuth vs App Password
Always connect Google Workspace accounts via OAuth rather than App Password. It’s more stable, has significantly less disconnection risk and doesn’t interrupt warm-up continuity when connection tokens refresh.
At 6,000 accounts, a 2% disconnection rate means 120 accounts losing warm-up progress simultaneously. With App Password, that’s a real risk: accounts disconnect when passwords change or Google flags the login. OAuth eliminates that entire failure mode.
Set up reply forwarding
If you’re running multiple sending domains and mailboxes, configure master inbox forwarding so all replies funnel into a manageable number of central inboxes. At scale, trying to monitor replies across dozens of individual mailboxes is unmanageable. Get this in place before you start sending, not after you have 50 active conversations scattered across 20 accounts.
Related reading
Best Cold Email Tools in 2026: Instantly, Smartlead and Apollo Compared — what each platform does best, pricing and when to use which.
Step 5: Warm Up Every Inbox Before Sending
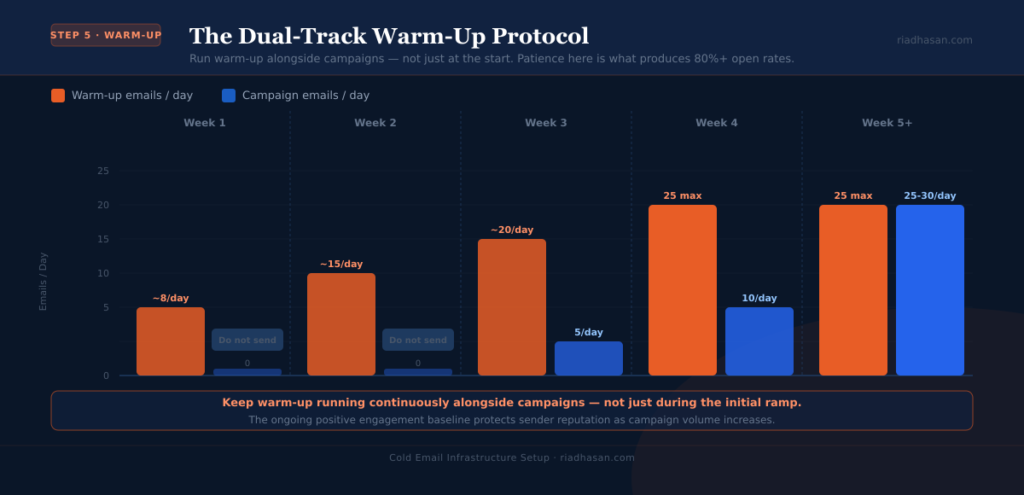
A new email account has no sending history. No reputation. Email providers have no reason to trust it. Start blasting cold emails from it on day one and you’ll hit spam folders immediately, potentially damaging the domain permanently before your first campaign even runs.
Warm-up is the process of gradually building sender reputation by sending a low volume of emails that receive positive engagement (opens, replies, moved from spam to inbox). Over 3–5 weeks this establishes a pattern of legitimate sending behaviour that email providers learn to trust.
The warm-up protocol I use
| Week | Warm-up emails/day | Cold campaign emails/day |
|---|---|---|
| Week 1 | 5, increasing by 1/day | 0 — do not send yet |
| Week 2 | Continuing ramp | 0 — do not send yet |
| Week 3 | Continuing ramp | 5 emails/day (conservative start) |
| Week 4 | Max 25/day (maintain throughout) | 10 emails/day |
| Week 5+ | Max 25/day (maintain throughout) | Up to 25–30 emails/day |
Keep warm-up running continuously alongside your campaigns, not just during the initial ramp. The ongoing warm-up activity provides a baseline of positive engagement that protects your sender reputation even as campaign volume increases.
Use a dedicated warm-up tool
Instantly, Smartlead and MailReach all have built-in warm-up. The warm-up pool sends emails between accounts in the network, with automatic positive replies to simulate genuine engagement. This is what produces the sender reputation signals email providers are looking for.
The critical metric to watch during warm-up: the positive reply ratio. Warm-up emails should be replied to and moved out of spam if they arrive there. A high positive reply ratio tells email providers this account sends wanted mail. That’s exactly the reputation you’re building.
Don’t rush it
Rushing warm-up is the single most common infrastructure mistake. I’ve seen founders skip the warm-up entirely because they’re impatient to start sending, burn their domains in the first week and have to start over from scratch.
The patience required in weeks one and two is what produces 80%+ open rates on day one of your actual campaign. Spend the time.
Step 6: Run an Inbox Placement Test Before You Send
Before launching any campaign, verify that your emails are actually landing in the primary inbox, not promotions or spam. Don’t assume they are just because the DNS records look correct.
Tools for inbox placement testing:
- GlockApps — tests delivery across Gmail, Outlook, Yahoo and others simultaneously, with a detailed breakdown of inbox vs. spam placement
- MailReach Score — gives you a sender score and inbox placement rate across major providers
- Mail-Tester — free, quick sanity check for spam score and authentication
Run a placement test after completing warm-up but before your first campaign. If anything is going to promotions or spam, diagnose and fix it before spending time on a campaign that won’t land.
Related reading
Cold Email Deliverability: Why Emails Go to Spam & How to Fix It — blacklist checks, complaint rate monitoring, inbox placement testing and how to recover a damaged sender reputation.
The Full Setup Checklist
Use this before launching any cold email campaign:
| Layer | Check |
|---|---|
| Domains | Secondary sending domains purchased — not your primary domain |
| Domain age | Domains are at least 2 weeks old before warm-up starts |
| Mailboxes | 3–4 mailboxes per domain, set up in Google Workspace |
| SPF | Configured and verified on every sending domain |
| DKIM | Generated in Google Admin, published in DNS, authentication active |
| DMARC | p=none policy set, reporting address configured |
| Custom tracking | CNAME pointing to sending tool’s tracking server |
| Tool connection | All mailboxes connected via OAuth (not App Password) |
| Warm-up | Running for minimum 3 weeks before campaign launch |
| Inbox test | GlockApps or similar confirms primary inbox placement |
| Blacklist check | All sending domains checked on MXToolbox — clean |
Frequently Asked Questions
Should I use a new Google Workspace domain or a secondary domain for cold email?
Always a secondary domain, never your primary Google Workspace domain. If a cold email campaign damages the sending reputation of a secondary domain, you replace it. Damage your primary domain and every business email you send is affected. The cost of a secondary domain is $10–15 per year. The cost of a damaged primary domain is your entire email reputation.
How long does cold email infrastructure setup take?
The technical setup (domain purchase, Workspace configuration and DNS records) takes 1–3 days depending on how many domains you’re setting up. DNS propagation adds another 24–48 hours. The warm-up period adds 3–5 weeks before you can send at full volume. Total time from zero to first campaign: approximately 4–6 weeks. Trying to compress this timeline is the most reliable way to damage your infrastructure before it’s produced a single reply.
What’s the difference between cold email infrastructure and warm email infrastructure?
Cold email infrastructure is built specifically for outbound prospecting: secondary domains, multiple mailboxes per domain, aggressive warm-up protocols and campaign management tools like Instantly or Smartlead. Warm (inbound) email infrastructure is your newsletter or product email setup: your primary domain, a platform like Mailchimp or Klaviyo and an opted-in subscriber list. They serve different purposes and should never share the same sending domain.
How many cold emails can I send per day per inbox?
30–50 emails per day is the safe limit for a warmed inbox. Going above that with a young domain increases the risk of triggering spam filters, even if the warm-up went well. Once a domain has 3–6 months of clean sending history, some practitioners push to 50–60 per day. But 30–50 is the standard range for reliable inbox placement without taking unnecessary risks.
Can I use Microsoft 365 instead of Google Workspace?
Yes. Microsoft 365 (Outlook) mailboxes work well for cold email and are particularly effective when reaching prospects who use Outlook themselves. Microsoft-to-Microsoft email tends to have strong inbox placement. The DNS setup is slightly different (different SPF includes, different DKIM setup flow) but the principles are identical. Some practitioners run a mix of Google and Microsoft mailboxes across their sending infrastructure to diversify delivery.
Does company name normalisation affect cold email deliverability?
Company name fields in your lead data (how you reference a prospect’s company in personalisation variables) don’t directly affect deliverability. That’s determined by your technical setup. But inconsistent or malformed company names in personalisation look unprofessional and signal a template, which hurts reply rates. Clean your data before importing into your campaign tool. “{{company}}” rendering as “acme corp LLC” or “ACME CORP” rather than “Acme” is an immediate credibility hit.
Get Your Infrastructure Right First
Cold email infrastructure is the least glamorous part of outreach. Nobody gets excited about DNS records. But it’s the part that determines whether everything else works.
Get it right and your campaigns start with an 80%+ open rate, clean sender reputation and a setup that scales without breaking. Skip it and you’re troubleshooting deliverability problems instead of booking meetings.
Here’s where to go next:
- Cold Email Best Practices 2026 — what to do once infrastructure is in place
- Cold Email Deliverability Guide — monitoring, blacklist recovery and keeping sender reputation healthy long-term
- Best Cold Email Tools — Instantly vs Smartlead vs Apollo, compared
- What Is Cold Email? — the full primer if you’re starting from scratch
If you’d rather have the infrastructure built for you (from domain purchase through DNS, warm-up and first campaign), you can work with me directly at riadhasan.com.